
Overview
It is the responsibility of the installer of the crane to comply with OSHA truck crane stability requirements as specified by CFR Part 1910.180 (C) (1). Stability testing is performed at 118% of maximum capacity (85% of tipping load) around the truck per SAE J765 – Crane Load Stability Test Code. OSHA allows for service cranes to lift an outrigger leg or wheel(s) off the ground during the test and consider the truck stable as long as the truck doesn’t tip.
Note: OSHA formerly had a 110% test limit for cranes that was relating to repairing and/or replacing structural equipment not for stability testing. OSHA has since removed the requirement from their standard.
Test Procedure
Warning: Only lift the test load about 6 inches off the ground while slowly rotating the load.
The stability test assumes the truck has the crane properly installed with the hydraulic relief pressure correctly set per the instructions in the crane owner manual.
The vehicle stability test is performed by following these procedures:
- Move the vehicle outside and position it so that the vehicle stability can be observed on a hard level surface to ensure crane is level to +/- 1% grade.
- Start the vehicle and let warm-up to operating temperature.
- Engage the vehicle PTO and warm hydraulic oil for 5 minutes.
- Extend the outriggers to full horizontal extension.
- Extend the jack legs downward sufficiently for the outrigger cross-tube to contact the top of the outer tube and unload the rear tires. Do not raise the tires off of the ground.
- Elevate crane to 0-15 degrees and rotate to the “B” possible position to pick up a load.
- Lower crane hook and attach 118% of the rated load. Reference load chart for that particular crane for rated load. All boom extension length dimensions are measure from the boom pivot pin centerline to the sheave centerline. Note: NexStar 4 cranes include a Stability Test mode that can be activated three times from the remote during installation.
- Lift the load about 6” from the ground using a forklift or other removable lifting device. Connect the crane hook to the suspended load and hoist up to take up slack and take the load from the lifting device. Remove the lifting device.
- If it will not lift off the lifting device then the vehicle is unstable and you must contact Auto Crane Engineering.
- Slowly rotate the crane through its entire operational range and note if the vehicle tips to the point of the load to contacting the ground. The test weight must not be swinging during this test. If the test weight contacts the ground stop the crane rotations and raise the weight clear of the ground. If it will not lift off the ground then the vehicle is unstable and you must contact Auto Crane Engineering. If the load is stable throughout the operational range then the vehicle is stable and the test is complete.
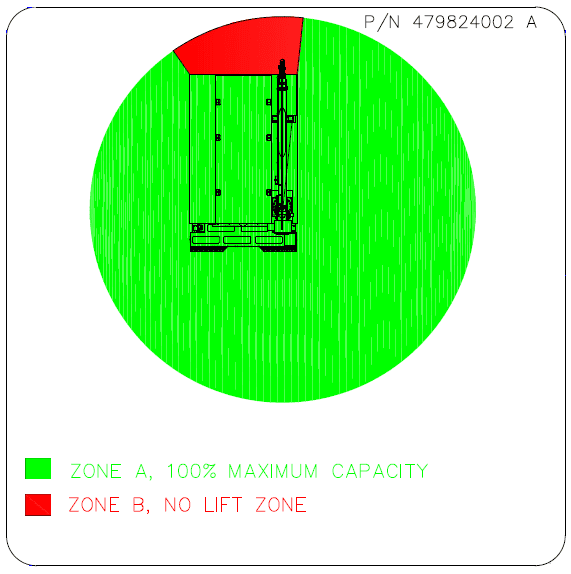
- If 100% stability is attained throughout the entire arc, place the “green” stability decal on the truck (e.g. inside the crane compartment door). Otherwise, write-in the percentage of full capacity in the respective arcs using the alternate stability decal.
Capacity-Stability Decals
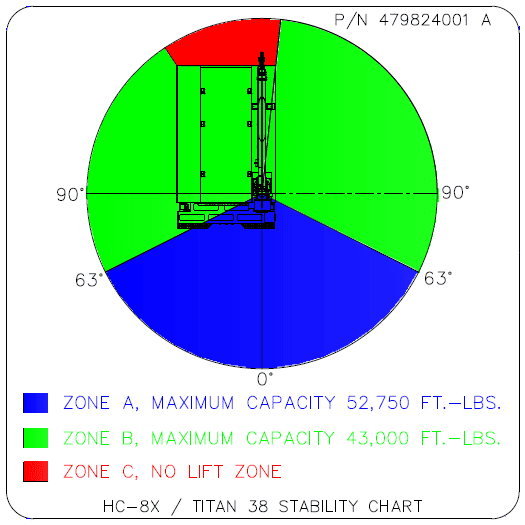
Auto Crane provides two stability decals with cranes. When using a crane with our Titan body and outrigger and properly matched chassis, the 100% stability decal can be used as shown below. The HC-8 and HC-8x have an alternate two-zone decal also shown below.
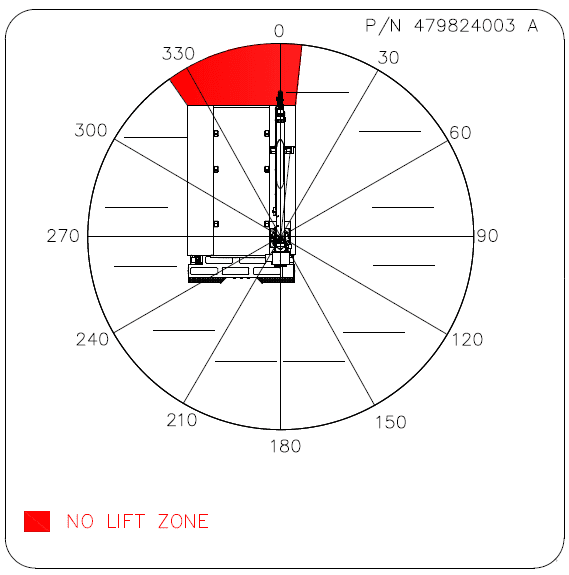
If the build does not meet 100% stability due to using another manufacturer’s body, outrigger, then a write-in stability decal must be used as follows:
Last Update: June 4, 2020
Tell us how can we improve this post.
Log In is required for submitting new question.
